 BERNINA Corporate Blog -
This is part 2 of my Summer Haze baby quilt project and focuses on quilting in the hoop using the B570 QE embroidery module – you can hop back to part 1 to read all about the fabric and pattern selection, as well as cutting and piecing the quilt top.
I spent a fair bit of time deciding how I wanted to do the quilting for this project – the B570 QE has quite a lot of options for quilters! I could have done a simple stitch in the ditch quilting with my Edgestitch foot, or gone for free motion using the Bernina Stitch Regulator (I still really want to try this!) but ultimately, the call of embroidery won out, and I decided to use my Small Clamp Hoop for the first time.

Previously, I’ve used (and loved) the Snap Hoop Monster with my bernette 79, so I was curious about the differences – but before I could get that far, I needed a quilting design!
Setup and drawing the pattern
I perused the built in designs as well as a few embroidery websites, but ultimately decided to draw my own. This quilt is a gift for my sister and her new baby and the nursery is woodland/forest themed, so I landed on an acorn and oak leaf motif. I decided to create a continuous line design where the ends of each line of stitching would line up with its neighbours, creating a design that looked continuous. In order to make it look truly continuous, I had to break it up into two separate stitching paths, so it would connect on all four sides. Here’s what my final design looks like:

I drew the design in Adobe Illustrator on my iPad – I like using illustrator for this kind of thing because of the ‘repeat’ feature, which allows you to automatically view a single motif repeated multiple times. I used this to make sure that the ends of my lines were aligned so that they’d attach to each other when stitched out side by side.

Digitising the quilting design
Once I was happy with the design, I imported it into the Bernina Creator Plus software to digitise the stitches. I did have to create a new embroidery hoop in the software using the available stitching area of the small clamp hoop, but this is a very straightforward process – you just enter the dimensions and a name, and hit save.
The design is set to a single run of stitching, and sized at 5.5” square. The hoop’s dimensions are 6.5” square, and I was originally planning on sizing my design at 6.5” to match, but I realised that doing this would mean that I’d lose the ability to fine tune the placement of each repeat in the hoop so the lines would match up. Making it 5.5” gave me half an inch of wiggle room on each side of my design, which took the pressure off making sure that the quilt was hooped perfectly down to the millimeter!

Of course, it’s always a good idea to test the stitch-out. I hooped up a scrap ‘quilt sandwich’ out of my batting and two layers of scrap quilting cotton for this purpose. At this stage I was focused on getting the thread tension correct – I used the regular hook instead of the yellow high-tension hook which I’d normally use for embroidery. I found that I needed to increase the tension slightly to help the bobbin thread pull up into the batting so the stitches would look even on both sides. I suspect this will be highly variable based on the batting you choose, the design, and your machine, so it’s definitely wise to do a test!

Quilting in the Hoop
Once everything looked perfect, I hooped up the centre of my quilt in the clamp hoop. When hooping, start by using the acrylic template to centre the design, and then add the clamps one at a time, in pairs – so the pairs are directly across from each other. This will help to ensure the quilt doesn’t get distorted.

Once you’re happy, and all the clamps are on, you can remove the acrylic template and get to stitching!

From here, I worked my way down in a column, then up to finish that column before stitching neighbouring columns to the right. When you make your quilt sandwich, you’ll want to make sure the batting and backing are both about 5-10” larger on all sides than the quilt top. Of course, there’s usually shrinkage, but you’ll also need that extra fabric for the clamp to hold on to when you get close to the edges of the quilt.

One of the cool things about this hooping setup is that you don’t have to remove the hoop and quilt from the machine between hoopings – you can just remove the clamps, shift the quilt, and re-clamp. My method was to simply shift the quilt so that my new area was within the stitching area and completely straight, so that I could fine tune the placement of my design using the machine but not have to worry about rotating the design.

This worked really well! I learned that the clamps can pull or distort the quilt if you let them, so it pays to be careful and take your time when reattaching the clamps.
Once I completed the right side of the quilt, I rotated my design and my quilt 180 degrees so that I wouldn’t have to deal with the large mass of quilt in the throat of the machine.

I managed to quilt the entire project at my small sewing table, although I was prepared to bring it out to the larger work surface if needed! I think if I were quilting anything larger than a baby quilt I’d have needed the extra space around the machine.
Observations after using this method
I really enjoyed quilting this project this way, and I adore the result – but I’m not sure I’d do it the same way again, so here are a few of my observations – I hope they help!
Design Choice
Choosing a continuous design that needed to be aligned precisely was the hardest way to start. I think quilting in the hoop with the clamp hoop would be best suited to a quilting design that is centered in a block or similar, rather than a continuous line design like the one I made. It’s not impossible, but I definitely spent a LOT more time working on the alignment of the blocks than I would have with a centered, contained design. It was quite fussy, and it was not my favourite part of the process. It didn’t help that my design had multiple points that needed to be aligned – even the smallest skew made a difference, and I do have a few spots on my quilt where I was unable to get the design to match up exactly.

Quilt Size
Size-wise, my quilt-wrangling was minimal even though everything needed to be so perfectly aligned, but I think larger quilts would be best suited to the Bernina 7 series machines, with their larger throat plates. This wouldn’t be an issue so much with regular quilting, but with the extra space needed for the hoop I think it might be a bit of a squeeze with a Queen or King sized quilt!

Leverage for clamping
I always keep my chair at a certain height when I sew, but I found I needed to increase the height slightly so that I’d have better leverage when adding the clamps to the hoop. Your mileage may vary here, and it’s worth noting that you do need to have reasonable hand strength to get those clamps attached. I’ve used the Snap Hoop Monster before, and that might be a better option for those with less hand strength.
Thread tangling
Very helpfully, the B570 pulls both thread tails to the back and takes a few stitches to knot before start a stitching line. In embroidery this is great because everything is held at the wrong side, but since the back side of a quilt is still visible we want to keep it neat! I experimented a bit with this, and found that the best way to keep nests from forming was as follows:
When you’re ready to stitch out, press the needle down button twice (down, then up). -pull the thread up, which brings the bobbin thread to the front of the work, and pinch both the bobbin and the upper thread (tightly!!!) while the machine forms the starting lock stitch and the first five or six stitches of the design. Then, depending on your design, either pause the machine to trim the tails or wait until it’s finished stitching to trim them. You may also wish to weave in the tails, but since my design included the locking stitches I didn’t do this. The tails at the end don’t tend to make a nest, so I was able to snip those off as normal.

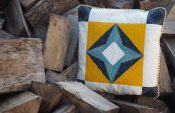
The result!

Overall, I love how this quilt is coming together, and I’m glad I chose the quilting in the hoop technique for it, because I learned so much! I’m very much looking forward to trying some different quilting techniques on future projects. The quilt still needs its binding and a very special quilt label, so stay tuned for part 3 if you’d like to see those finishing touches!
As always, you can see more of what I’m up to by following me on Instagram, TikTok, YouTube, and my blog!


Good job. I have also used the Snap Hoops for continuous quilting with excellent results. The one negative with at is that you can cease the Snap Hoop, but Bernina doesn’t recognize the square corners Abe reduces the embroidery field to the nearest oval shape. 🙁