We warmly welcome you to this year’s Advent calendar on our BERNINA blog! We have now reached the last month of the “Year of Embroidery”, so our motto this year is, needless to say, Embroidery with BERNINA! In the coming days, you can look forward to 23 more creative, inspiring and Christmassy embroidery projects. We hope you are very excited.
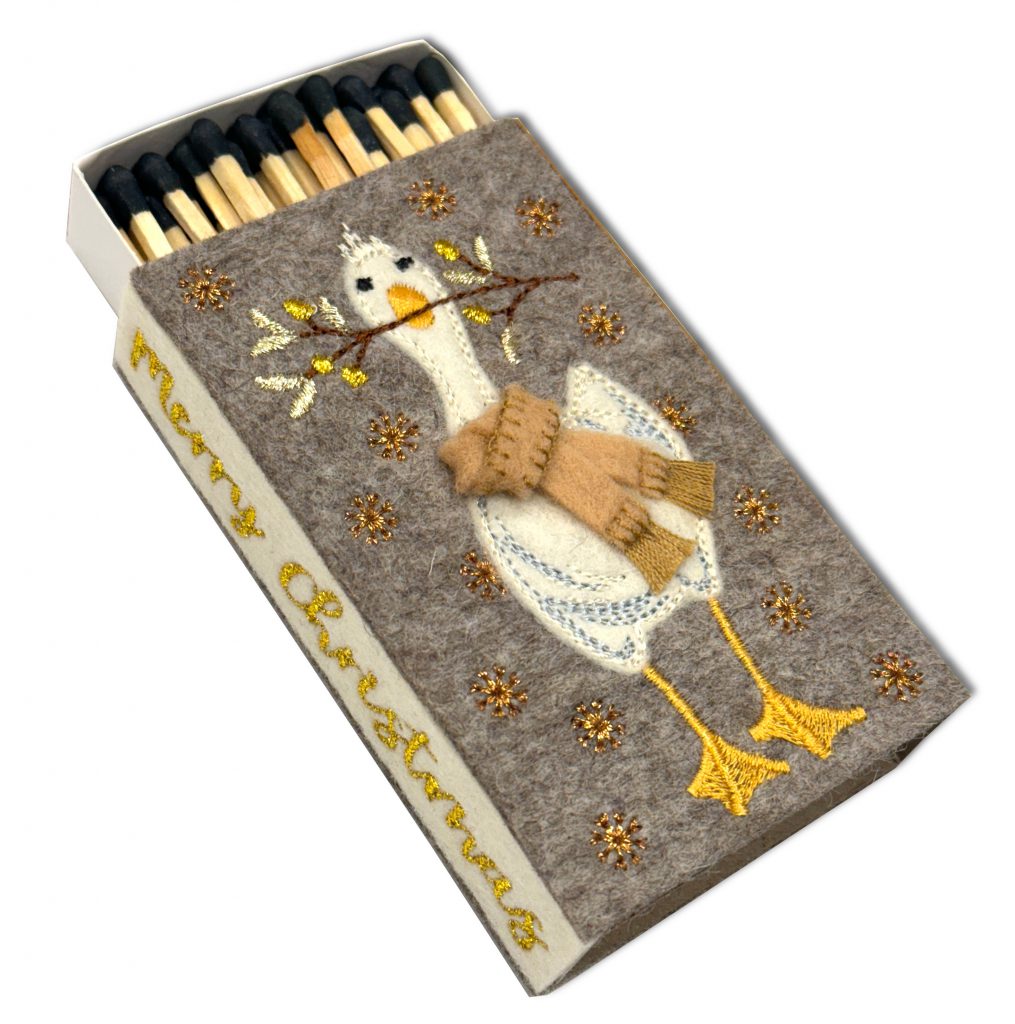
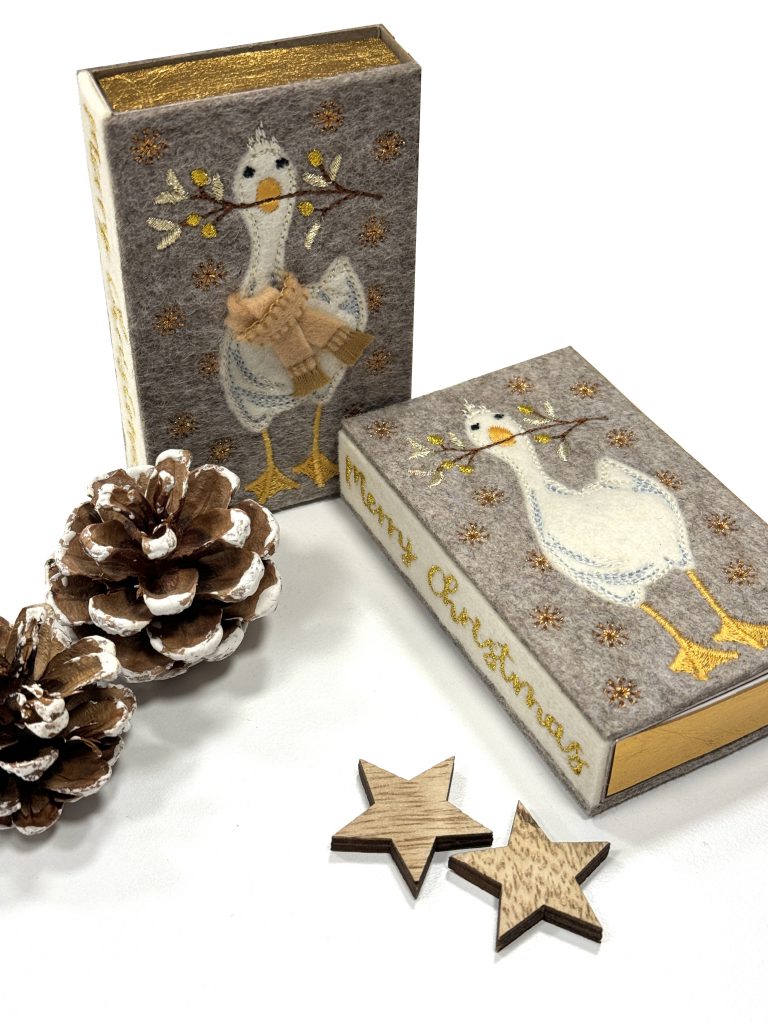
I am all the more delighted to have the pleasure of opening our digital Advent calendar again this year! Embroidery is one of my really great passions! You simply wouldn’t believe what I’ve already embroidered – this time, it’s a matchbox with a funny Christmas goose. It can be seen on the box from the front and back, either with or without a scarf.
Beautiful for your own Advent table, but also a wonderful gift or a Secret Santa present.
In my today’s post, I’ll show you how to make this enchanting little box. Please find the link to the free embroidery file in the next but one paragraph
Decorating a matchbox with embroidery – Material supplies
For one box you need:
- approx. 16 x 13 cm wool felt in light gray mottled | 2 mm thick
- approx. 3 x 13 cm wool felt in natural white | 2 mm thick
- approx. 9 x 10 cm fine, thin wool fleece in natural white| 1.2 mm thick (alternatively flannel in natural white)
- approx. 15 x 0.7 cm or approx. 2 x 2 cm fine, thin wool felt in light brown | 1.2 mm thick for the scarf
- approx. 14 x 5 cm gold-colored sewing cardboard
- a sufficient amount of tear-away stabilizer
- Embroidery thread, e.g. POLY SHEEN by Mettler in the colors: 0811, 0020, 1134, 3971, 0870
- Metallic yarn, e.g. METALLIC by Mettler in the colors 0490, 1134, 0496
- Bobbin thread in white by Mettler
- a large matchbox (here measuring 11 x 6.5 x 2 cm) (bought at the large German drugstore with the two letters)
- a liquid glue, e.g. textile adhesive
- If necessary, scraps of thicker yarn for the fringes of the scarf, e.g. EXTRA STRONG by Mettler
Kostenlose Stickdatei herunterladen
You can download the corresponding embroidery file in two versions here – for the goose with or without scarf.
Embroidery file_Christmas goose
Click on the download link to download a ZIP file to your computer. As a rule, you will find then find the file in the download folder. Unzip the ZIP file before transferring the embroidery files to your machines.
The format created in the embroidery file fits the above-mentioned dimensions of the matchbox exactly. If your box differs in size, you can adjust/compensate for this later when cutting the felt after embroidering. See further details below.
Tips and tricks for processing metallic threads
Not only at Christmas time are metallic threads a wonderful detail in embroidery projects. Processing is not nearly as demanding as it is often assumed. With the following tips, your metallic embroidery will succeed:
- Reduce the speed of the embroidery machine, maximum half of the total speed, even less if required
- Use a special metallic embroidery needle. The thread is less “stressed” in its eye, reducing the probability of thread breakage.
- Work with the BERNINA sewing thread lubrication unit. It provides valuable support when processing metallic yarns. Before sewing, the thread runs through a special silicone fluid. This noticeably improves the gliding properties and reduces thread breakage.
- Use high-quality metallic threads, e.g. the metallic thread by Mettler.
How to embroider | ‘Goose with scarf’ version
First, I’ll show you how to embroider the wool felt pieces. The free embroidery file also contains a version without a scarf. This is almost identically processed, only the sequences/work steps for attaching the scarf are omitted.
Hoop a piece of tear-away stabilizer in the oval embroidery hoop. Sequence 1 embroiders the placement line for the wool felt.
Place the corresponding wool felts (light gray mottled and natural white, each 2 mm thick) on the placement lines and embroider them using sequence 2. The embroidery color is not important here, because this line will be cut away later.
In sequence 3, the snowflakes follow in copper-colored metallic yarn.
Continue with the legs in yellow.

Afterwards, the placement line for the wool felt of the geese is embroidered. Basically, you can embroider this in any color, as it will be covered by the felt straight away.
After that, the branch for the goose on the back is embroidered. The one on the front will follow later, once the appliqué fabric has been placed.
The next embroidery line is used to stitch on the felt for the scarf. From now on, you have to be careful that the ends don’t get caught anywhere they don’t belong. If necessary, you can fix them with painter’s tape/adhesive tape. The strip is approx. 7 mm wide and long enough that it can be tied nicely later before being cut back.
Then place a piece of thin wool felt (1.2 mm thick) of sufficient size on the placement line and embroider it in natural white. It is important that you fold away the side of the scarf, shown here on the right, so that it is not stitched into the tail.
Afterwards, remove the hoop from the machine, but never take the embroidery material out of the hoop! Use small, curved and pointed scissors to cut back the excess felt. Take care not to accidentally cut the scarf!
In the next two sequences, the details of the geese are embroidered in natural white and light gray. This gives the beautiful and soft wool felt a slightly three-dimensional look. Unfortunately, you can’t see this very clearly in the picture.
The final steps …
The machine then embroiders the placement line for the wool felt of the scarf. Place a piece of felt of sufficient size on top and embroider it in place in the next sequence. Once again, the material is cut back close along the edge.
Use the following sequence to embroider the outline of the scarf.
Now it’s the turn of the beak in bright mustard yellow!
With the branch on the front, the lettering as well as the leaves and berries, the last sequences follow.
The embroidery is now complete. You can take it out of the frame and cut it back along the basting line. Please check beforehand whether the dimensions of the embroidery fit the dimensions of your matchbox. If necessary, you can make minimal adjustments. The large basting stitch can be easily undone if required.
It is important that you remove the embroidery stabilizer on the back thoroughly so that the felt can stick well to the box later on. If you were only to stick on the fleece, the felt would probably soon fall off.
Finishing the scarf
In the version with the scarf, it must be processed before the wool felt is glued on. Intertwine the ends loosely according to your preference and fix them either with textile glue or a few stitches by hand. I have placed the hand stitches invisibly under the knot.
If you like, you can also attach fringes. I used EXTRA STRONG by Mettler for this. Small pieces of thread, arranged to form a loop, were pulled through the felt from top to bottom.
At the end of the scarf, I brought the loop back up to the upper side again. Place the two thread ends through the loop and pull them tight. Continue in the described way until all the fringes are finished.
Additionally, I have also embellished the neckline with EXTRA STRONG by Mettler and a few hand stitches.
Gluing the matchbox
Now the pieces are glued onto the box. This works well with conventional all-purpose glue, but I think it works even better with textile glue.
After checking the measurements (please read this paragraph carefully before cutting), I cut the pieces with the rotary cutter. If you use felts with a different thickness, the dimensions also need to be adjusted!
I iron all pieces from the back with very little steam. This makes them nice and smooth and easier to stick on.
First, I glue the side panel to one of the edges of the box. I coat both sides with glue, allow it to dry briefly and press the two parts together.
The width of the front and the back sides corresponds to the width including the side panel that has just been glued on.
Later the side looks like this:
Before that, however, the front and back sides still need to be glued on. Please remember to remove the stabilizer well so that the felt can stick properly to the cardboard.
One side without wool felt is left. This edge doesn’t appeal to me at all.
So, I cover this edge with two pieces of gold-colored sewing cardboard. One strip is 7 mm high. The width corresponds to the box width.
I have covered the short ends of the box with sewing cardboard too.
Are you also in the mood now to decorate one of these boxes with this charming embroidery?
For today, I wish you and your families a wonderful and peaceful Advent season with plenty of time for creative hours – perhaps to work on one or two projects from our BERNINA blog! I wish you lots of fun and pleasure in doing so!
Warmest regards,
Your Claudia
 BERNINA Corporate Blog -



love it just discovery your page
What a fun pattern!
I really want to do this but do I sign up so i get the next steps.
Dear Gaynel,
I do not quiet understand – the project is finished, which next steps do you mean?
I love the idea of an advent calendar, this is very cute. I will endeavour to try this, to get back to using my embroidery unit, have been quilting for so long !
This is so cute, can’t wait to sew it out. Thank you and look forward to the next advents doors.
Very cute. Thank you.
This will be a challenge to get all the supplies. I like the challenge
I love this! So cute and creative
Really cute. I think I’ll make as an ornament for tree. Thank you:-))
Really cute. I think I’ll make as an ornament for tree. Thank you:-))
Very cute! Thank you!